Wednesday, 11 July 2018

How to send links to iCloud photos in iOS 12


How to send links to iCloud photos in iOS 12

Every year Apple announces some pretty awesome updates when it comes to their iOS software, and this year is no different.


Betas have been released already, and as people are figuring out which new features do what, it’s worth noting that not all beta updates are permanent.


iOS 12 has been in developer beta since just after it was announced at the WWDC keynote on June 4, 2018. As of today, it’s also available for public beta. If you want to test it out and provide feedback before launch, you can sign up now and get your download on. Just remember, beta means beta, and there’s no guarantee features and apps you count on will behave as expected — or at all. (Rene Ritchie, iMore)


However one feature that’s been noted with the iOS 12 beta is the ability to send direct links to iCloud photos. You can even send multiple links at a time which will last for up to 30 days.


Here’s how to do it.Most trending:How to Tell if Someone Has Blocked You on Kik Messenger 2018


Federico Viticci


✔@viticci


· 4 Jul


Pretty cool new feature in iOS 12 beta 3: you can now easily generate http://iCloud.com links for individual pictures in the Photos app to share with others. Links last for 30 days. pic.twitter.com/YLFQrsTx0O


Dave@davebrobertson


Finally! Sharing with links is something I do often with Google photos. A native feature to iOS will take that extra step out


6:47 AM - Jul 4, 2018


1


See Dave's other Tweets


Twitter Ads info and privacy
What do you think?

Thursday, 5 July 2018

iPhone Won’t Delete Voicemail?


iPhone Won’t Delete Voicemail?


Set Your Phone to Airplane Mode


This is one of the easiest solutions for “iPhone won't delete voicemail” issue. Many users have succeeded in deleting voicemails via this method. The method is quite simple as all you have to do is set your phone to Airplane mode. Follow these instructions:


On your iPhone Home Screen, swipe up from the bottom. A new window will appear.


On that window, tap the Airplane mode.


Now open the Phone app and tap Voicemail and then delete the voicemail messages.


Turn off the Airplane mode. Your deleted voicemail messages won't come back.


Delete from Network


All your voicemail messages are automatically downloaded by your iPhone from the voicemail server of the company. The messages are then stored on your iPhone storage. If your iPhone storage becomes full, then the new messages aren't downloaded automatically because there is no space for them. Sometimes deleting voicemail messages from your iPhone solves the problem. However, if the Airplane mode method doesn't solve the problem, then you will need to delete those messages directly from server or network. Follow these instructions:


Open the Phone app on your iPhone.


From the bottom of the screen, tap the Keyboard icon. The dialer will appear.


Now use the dialer to dial your own telephone number. It will allow you to access your voicemail. You can also use the shortcut provided by your service provider to access your voicemail. Dial “*86” if you are using Verizon Wireless or hold the “1” key if you are using AT&T.


Once you have access to your voicemail, press 1 to listen to your voicemail messages. The system will play your new messages first and then play the old, stored messages. You can also select the voicemails and delete them during that call.
Reset Your iPhone


If none of the above-mentioned methods worked, then there is one solution that will definitely work i.e. resetting your iPhone. Keep in mind that resetting your iPhone will erase all your settings and configurations as well as delete all your iPhone data. So, it is recommended that you back up your data before proceeding.


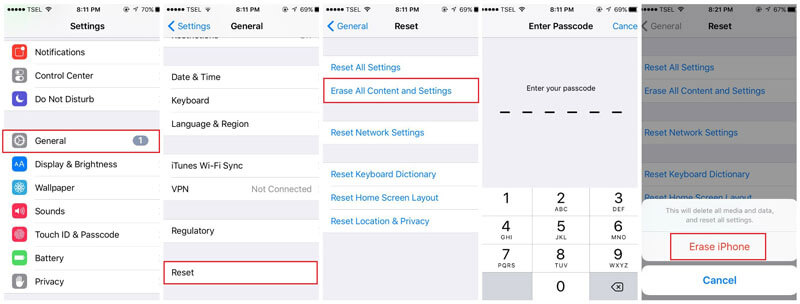
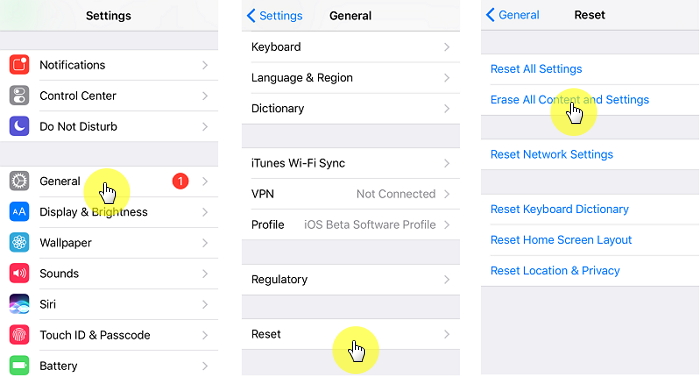
On your iPhone, open the Settings app.


Navigate to General > Reset and then tap on Erase All Content and Settings.


Confirm your action by inputting your passcode. After that, tap the Erase iPhone option. Your Apple ID and password may also be required for the reset.Do you like this story?


Sponsor Ads:


Gihosoft Free iPhone Data Recovery is a professional iPhone Data Recovery software to get back all your lost text message, photo, video, call history, note, contact and more from iPhone/iPad/iPod Touch. It offers a full solution to recover your lost data in different tough situations. Besides recovering data directly from iPhone, iPad and iPod touch, it also allows you to recover data from iCloud and iTunes backup files.


Clear Deleted Voicemail Messages


If you have successfully deleted your voicemail messages but they reappeared after some time, then the problem may be due to the fact that voicemail message deletion works similar to Recycling Bin or Trash on your computer. What this means is that the messages you delete are not actually erased from your iPhone storage, instead they are moved out of your inbox and marked to be deleted later. Since the messages are still available on your iPhone storage, it is likely that they will reappear in your inbox after some time.


The solution to this problem is to clear the deleted messages because your voicemail messages are only truly deleted if they are cleared after being marked to be deleted. It's just like emptying the Recycling Bin or Trash on your computer. Here are the steps to do this:


Open your iPhone, tap the Phone icon and then select the Voicemail icon shown in the bottom right corner of the screen.


If you have already deleted some of your voicemail messages but they haven't been cleared yet, then you will need to visit the Deleted Messages section to clear them.


Once in that section, select the Clear All option and your deleted voicemail messages will be cleared.


How to Reset iPhone to New 2018 top Guide


How to Reset iPhone to New 2018 top Guide

Hоw Do You Rеѕеt iPhone 7/7 Plus wіth іTunеѕ


If you prefer, you can also reset your iPhone using iTunes. This method is suitable for the situation that you may just give your iPhone to your family member or your friends.


Step 1: Connect your device to the computer.


Step 2: Open iTunes and Click the device tab from the top left corner.


Step 3: Click “Restore iPhone” in the Summary tab of iTunes.


Step 4: iTunes will ask if you’re ready to restore you iPhone, and click “Restore”.


Step 5: After it finished, iTunes will ask if you want to restore from backup, choose “Set up as a new iPhone” to start fresh with factory settings.


Nоtе: When the process done, iTunes will install the latest version of iOS software on you iPhone. Please note that the data just deleted still can be recovered, so if you need to erase them permanently you will need iMyFone Umate Pro for Windows or iMyFone Umate Pro for Mac to help you.
How to Reset iPhone to New in Settings
Also Read:Top 9 Best Alternative Websites to AudioBook Bay in 2019
Also Read:How to Download Tumblr Videos and GIFs to iPhone or iPad
Also Read:How to Password Protect Zip File on Windows 10/8/7?Also Read:How to Fix Your iPhone Microphone Not Working (iOS 12 Supported)If you aren’t too familiar with iTunes, you can also reset your iPhone directly from the settings option on it. This method is just to reset your iPhone to new simply not completely. Here’s how:


Step 1: Click on Settings > General > Reset.


Step 2: Click on Erase All Content and Settings.


Step 3: Enter your Passcode or Apple ID.


Step 4: Confirm your choice to erase data.


And it’s that simple. Just wait for your data to erase and follow the steps to set up your phone.


Note: Remember that this option resets your phone and erases your data, but nothing is permanently erased. This method is okay if you are going to continue using the phone yourself, but we wouldn’t recommend if you are going to sell or donate it.
How to Reset iPhone to New Remotely


If you haven’t reset your iPhone before you giving or donating it way, or even worse that you have lost your iPhone, or if your iPhone has been stolen, you can use iCloud to delete your data remotely. Here’s how:


Step 1: Log into iCloud in www.iCloud.com/#find and click Find iPhone.


Step 2: Click on “All Devices” and find the device you would like to erase.


Step 3: Click Erase iPhone and wait for the process to finish.


Note to users: You can only use this option if your “Find My iPhone” option is turned on. For security purposes, we recommend always having this option turned on.

Do you like this story?
Sponsor Ads:
Gihosoft Free iPhone Data Recovery is a professional iPhone Data Recovery software to get back all your lost text message, photo, video, call history, note, contact and more from iPhone/iPad/iPod Touch. It offers a full solution to recover your lost data in different tough situations. Besides recovering data directly from iPhone, iPad and iPod touch, it also allows you to recover data from iCloud and iTunes backup files.

How to use Samsung's Infinity-O display as a notification LED

How to use Samsung's Infinity-O display as a notification LED Chainfire, the famous and historical developer of Android apps (but not on...